
Installation and Connection
Install BAAS Tauri, prepare the backend, set the key, create a profile, and connect an emulator.
The installation flow must make three parts work together: the Tauri client, the BAAS backend service, and the emulator or game client. Tasks can run only after the home page shows the service as connected and the Server/ADB configuration can reach the target instance.
Do Not Skip Connection Validation
Installation completion does not mean unattended automation is ready. Verify backend connection, key authentication, ADB device, and one low-risk task before enabling sweeps, shop, arena, or other resource-spending tasks.
Flow Overview
Download and Run the Desktop Installer
Download the package that matches your operating system and CPU architecture from GitHub Releases, then start the BAAS Tauri installer.
Choose Backend Directory and Install Options
Use a stable writable backend directory with a simple path. On unstable networks, open Advanced Settings first to adjust language, theme, update source, or MirrorC CDK.
Start Installation and Wait for Backend Startup
The installer synchronizes dependencies, writes runtime state, and starts the backend service. Keep the installer log screenshot if it fails.
Initialize the Key and Create a Profile
On first backend connection, initialize or enter the BAAS key, then create a profile for the current account or emulator instance.
Configure Server and ADB
Set game server, ADB IP, ADB port, emulator path, screenshot method, and control method. Use ADB detection to confirm the target device is online.
Validate with a Low-risk Task
Run low-risk tasks such as cafe, mail, or reward collection first. Enable resource-spending tasks only after logs, remote display, recognition, and clicks are correct.
Download the Desktop Installer
First download the BAAS Tauri client package for your operating system and CPU architecture from GitHub Releases. This documentation site reads the latest Release and lists direct installer links automatically. If the list cannot load, open the Releases page and choose the package manually.
Download BAAS Tauri
Download BAAS Tauri
The recommended package is selected from your system. You can switch OS and package type manually.
Loading latest release...
⚠️ macOS Notarization Notice
BAAS Tauri macOS packages are not Apple-notarized. On first launch, macOS Gatekeeper may report that the developer cannot be verified, the app is damaged, or the app should be moved to Trash. Download only from the official GitHub Releases linked here; if you trust that source, use the steps below to allow the app.
Open the
.dmgand dragBAAS Tauri.appinto Applications.- In Finder, Control-click the app, choose Open, then confirm Open in the dialog.
If macOS still blocks it, try opening the app once, then go to System Settings -> Privacy & Security and click Open Anyway in the security section. Apple notes that this option appears only for a limited time after a launch attempt; see
Apple's Gatekeeper instructions
.
If macOS says the app is damaged and you confirmed the file came from official Releases, remove the download quarantine attribute:
xattr -dr com.apple.quarantine "/Applications/BAAS Tauri.app"Do not disable Gatekeeper, do not disable SIP, and do not run the command above for apps from
unknown sources. If the app path is different, type
xattr -dr com.apple.quarantine in Terminal, then drag the app icon into Terminal
to insert the path.
| System | Recommended Package | When to Choose |
|---|---|---|
| Windows x64 | BAAS.Tauri_*_x64-setup.exe | Most Windows PCs |
| Windows ARM64 | BAAS.Tauri_*_arm64-setup.exe | ARM-based Windows devices |
| Windows x64 fixed WebView2 | BAAS.Tauri_*_x64_fixed_webview2-setup.exe | WebView2 is missing, damaged, or the normal installer cannot launch the app on x64 devices |
| Windows ARM64 fixed WebView2 | BAAS.Tauri_*_arm64_fixed_webview2-setup.exe | WebView2 is missing, damaged, or the normal installer cannot launch the app on ARM64 devices |
| macOS Apple Silicon | BAAS.Tauri_*_aarch64.dmg | M-series Macs |
| macOS Intel | BAAS.Tauri_*_x64.dmg | Intel Macs |
| Linux Debian/Ubuntu | BAAS.Tauri_*_amd64.deb or *_arm64.deb | Debian, Ubuntu, and derivatives |
| Linux Fedora/RHEL | BAAS.Tauri_*_x86_64.rpm or *_aarch64.rpm | Fedora, RHEL, openSUSE, and other RPM distributions |
After downloading, run the installer package to start BAAS Tauri. The backend directory, update source, and MirrorC CDK are configured inside the installer afterward.
Installer Home
The installer selects the backend directory, opens advanced settings, and starts environment preparation. Use a stable writable path without special permission requirements.
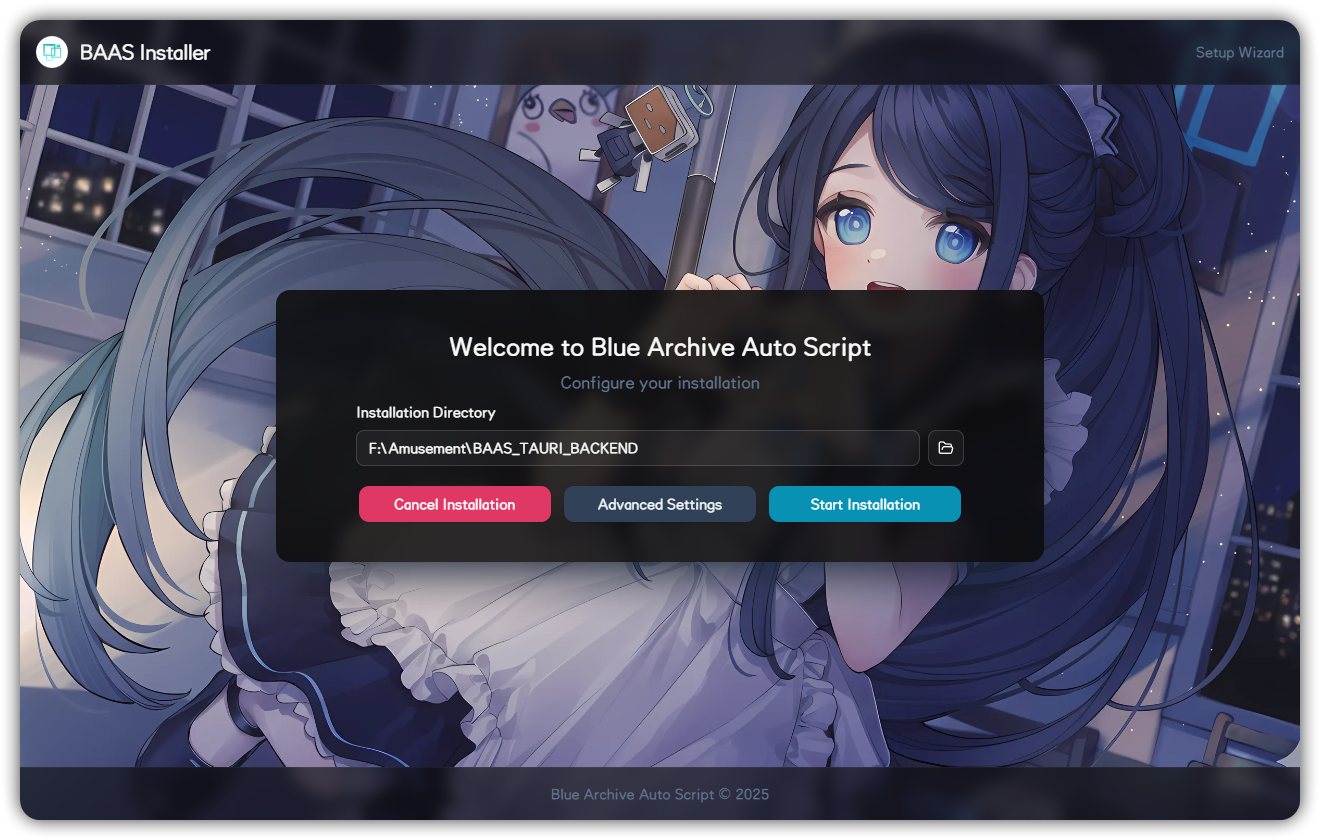
| Control | Purpose | Recommendation |
|---|---|---|
| Install directory | Backend files, dependencies, and runtime data | Use a stable writable path |
| Cancel installation | Exit installer | Check logs before retrying after interruption |
| Advanced settings | Language, theme, update channel, update tests, MirrorC CDK | Configure this first on unstable networks |
| Start install | Prepare backend environment | Keep a screenshot if it fails |
Advanced Installation Settings
Advanced settings control installer language, theme, update channel, update testing, and MirrorC CDK before installation starts.
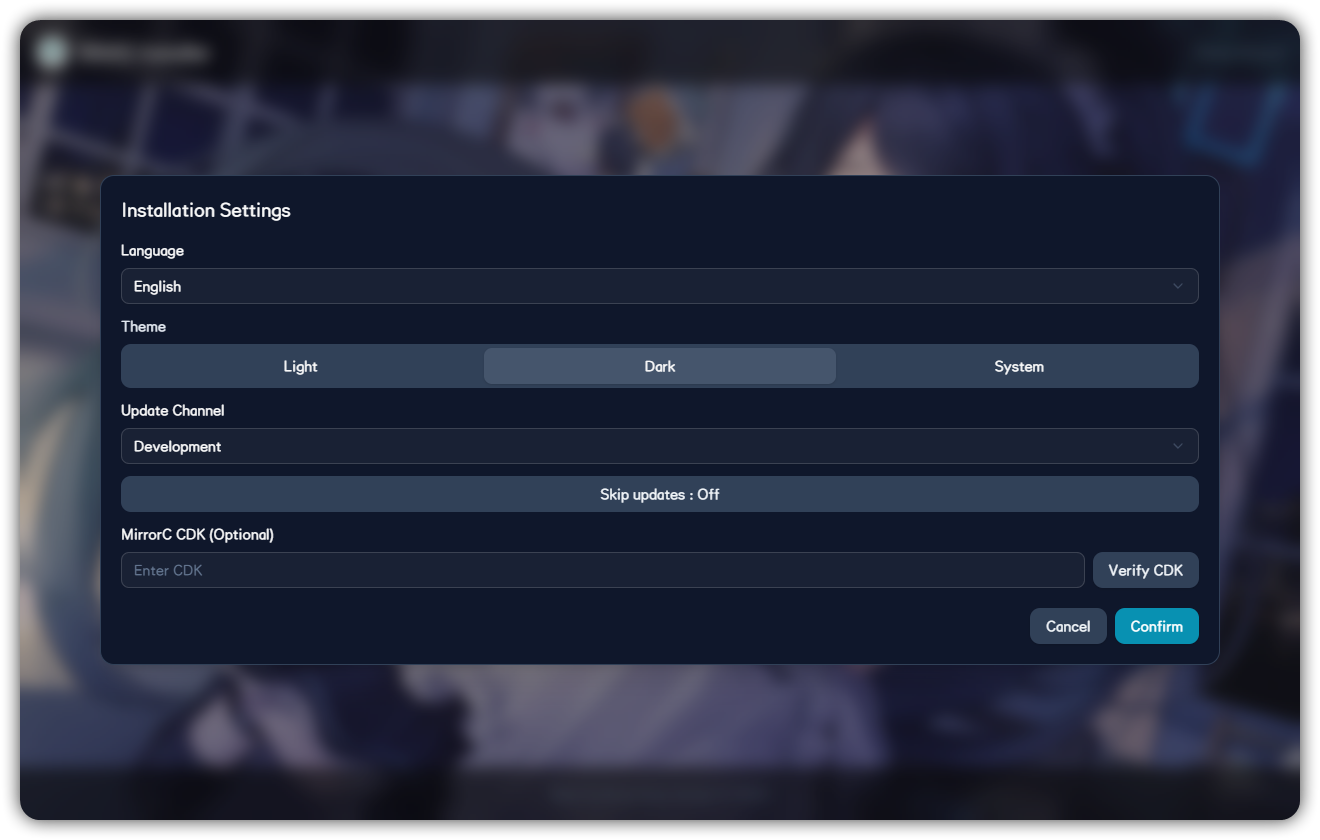
| Setting | Description | When to Change |
|---|---|---|
| Language | Installer and later UI language | Before first install |
| Theme | Light, dark, or system | Personal preference |
| Update channel | Stable or development | Stable for daily use, dev for testing |
| Test update | Test source availability | When network quality is unclear |
| MirrorC CDK | MirrorC acceleration credential | When using MirrorC |
Installation Logs
After starting installation, the installer runs repository checks, PyPI source selection, dependency synchronization, cache cleanup, and backend startup. Keep the log screenshot if installation fails.
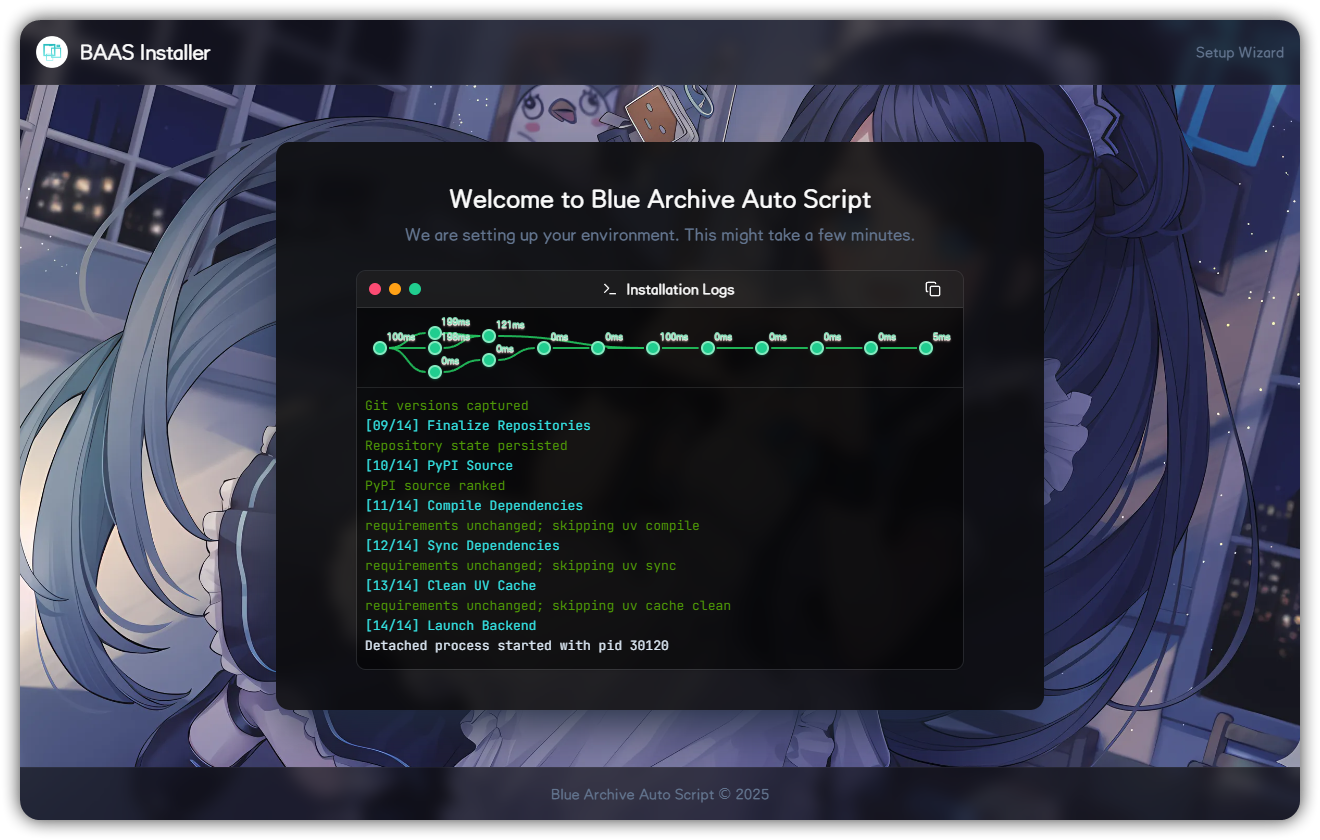
After installation, the backend starts as a separate process. First startup may take longer while dependencies are prepared.
Key and Authentication
On first backend connection, the client asks you to initialize or enter the BAAS key. This key authenticates the local service. It is not your game account password.
Recommendations:
- Save the key only on trusted devices.
- Do not include the key in screenshots or logs.
- If the home page stays connecting, check backend startup, local port, firewall, and key consistency.
Create a Profile
Profiles store server, ADB, emulator, script, task, and scheduler settings. Click New Profile from the top-right area, then enter a name and game server.
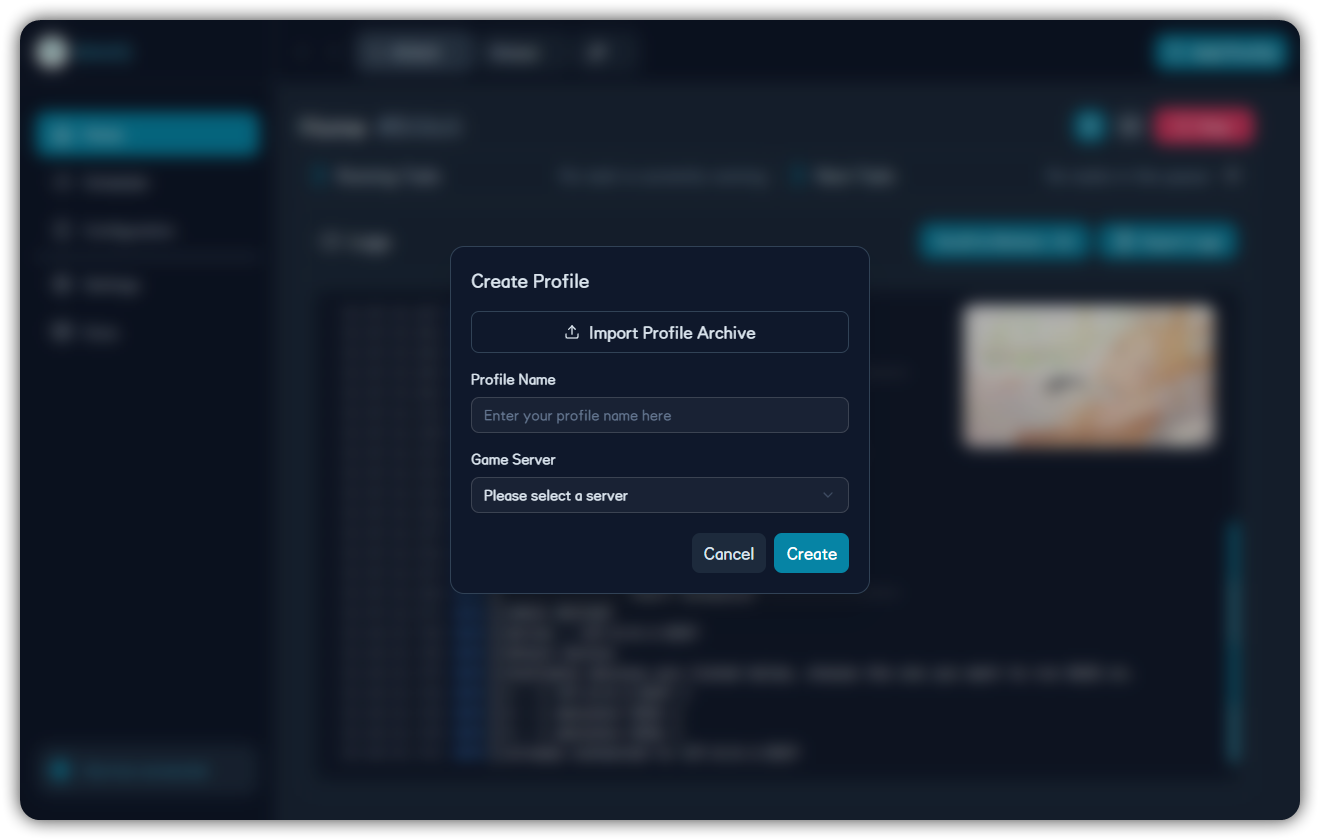
Profile guidance:
- Use one profile per account or emulator instance.
- Do not mix CN official, Bilibili, Global, JP, and KR ONE settings in the same profile.
- Export a tuned profile as
.zipfor backup, migration, or support reports.
Connect the Emulator
After creating a profile, configure game server, ADB IP, ADB port, emulator path, emulator type, screenshot method, and control method in Server, Emulator, and Script. Use ADB detection to confirm the available device.
Common connection failures:
- ADB or developer debugging is disabled in the emulator.
- Multi-instance port does not match the target instance.
- Another ADB service occupies the connection.
- Firewall or security software blocks a local port.
- Backend logs show permission, path, or authentication errors.
First Run
Do not enable many tasks immediately. Start with low-risk tasks such as cafe, mail, or reward collection. Confirm logs, screenshots, recognition, and clicks first, then add sweeps, shop, arena, events, and combat tasks gradually.
First-run Success Criteria
Home can start a task, logs continue updating, remote display shows the correct game page, and the final resource or state change matches expectations.